in mdk
tcl-8.3.3-21mdk
tk-8.3.3-21mdk
itcl-8.3.3-21mdk
itcl is incr tcl that includes many useful widgets
Notes: August 2004 Archives
edit master.cf
smtp inet n n n - - smtpd
-o content_filter=filter:
filter unix - n n - - pipe
flags=Rq user=filter argv=/path/mailfilter.sh ${sender} ${recipient}
edit /path/mailfilter
# file mailfilter.sh
# this sample script add http://pank.org at the bottom of message
TEMP=/tmp/temp-$$.eml
cat > $TEMP
RCPT=`echo $@ | cut -d' ' -f2-`
{
cat $TEMP
echo -e "\n--\nhttp://pank.org\n"
} | $SENDMAIL -i $RCPT
rm $TEMP
Joe 是我習慣用的編輯器, 最近出了 3.x 版
http://sourceforge.net/projects/joe-editor/
Download
好用新功能
3.0 部分
- Syntax highlighting
這個功能對寫程式很好用
- Auto detect CR-LF (MS-DOS) files
若是 DOS format file, 不會看到最後的^M, 編輯後的格式仍是 DOS format, 可以用 ^T, Z 關掉
- File selection window is now 4 lines instead of 1
^KE, 選擇編輯檔案新增為4行(3.1版是多行)
3.1 部分
- Use ^T E to set character set of file (hit
prompt for a list of available character sets).
可以設文件的 charset
- TAB completion is now more "bash"-like
選擇編輯檔時按 tab 表現
- Added -icase option for case insensitive search by default.
忽略大小寫的搜尋參數
- Added status line sequence %x: shows current context (function
name if you're editing C).
第一行狀態列顯示目前在那個 function (寫程式好用)
- Added tab completion at search prompts and ESC-Enter for tab
completion within text windows.
在搜尋時, 按 tab 自動補齊可能 keyword
在內文打字時, 參照內文自動補齊, 例如在編輯程式時, 打了 inc 再按 ESC-Enter 會自自補齊變成 include
- Added Ctrl-space block selection method
按 Ctrl-space 選取區塊, 可惜這功能鍵在 Windows 下和切換輸入法衝突, 無法在 Winodws 下使用
- ^K E asks if you want to load original version of the file
再編輯同一個檔尚未存檔時會問要不要載入原檔
其他新增功能
^@ insert 這功能名為 insert, 但是試的結果和 Ctrl-space 差不多, 可用來選取區塊
^K, ^K. 左右平移一次動2格
I-SEARCH ^[R Backwards ^[S Forwards 立即落點至搜尋字串
環境: 兩條對外網路, 兩個 ATU-R 均接到 Hub, 電腦接 Hub
IP1 100.100.100.100/24 Gateway 100.100.100.254
IP2 200.200.200.200/24 Gateway 200.200.200.254
ifconfig eth0 100.100.100.100 netmask 255.255.255.0
ifconfig eth0:0 200.200.200.200 netmask 255.255.255.0
由於 default gateway 只能設一個, 所以會有其中一個 IP 不通
必需用 ip route2 來解決這個問題
kernel option 中的 IP: policy routing 必需勾選(CONFIG_IP_MULTIPLE_TABLES)
否則在使用 ip rule 時會出現如下錯誤訊息
# ip rule list
RTNETLINK error: Invalid argument
dump terminated
先在 /etc/iproute2/rt_tables 下建兩個 table
echo "100 line1" >> /etc/iproute2/rt_tables
echo "200 line2" >> /etc/iproute2/rt_tables
# 設定 line1 的 gateway
ip route add default via 100.100.100.254 table line1
# 設定 line2 的 gateway
ip route add default via 200.200.200.254 table line2
# 指定從 100.100.100.100 進來的連線走 rule line1
ip rule add from 100.100.100.100 table line1
# 指定從 200.200.200.200 進來的連線走 rule line1
ip rule add from 200.200.200.200 table line2
設完後, 從外面連兩個 IP 都可以通
連外負載平衡
kernel option 中的 IP: equal cost multipath 必需勾選(CONFIG_IP_ROUTE_MULTIPATH)
指定 multipath
ip route add default scope global nexthop via 100.100.100.254 dev eth0 weight 1 \
nexthop via 200.200.200.254 dev eth0 weight 1
設完後就達成 line1 line2 路由平衡, 可以調整 weight 參數來決定 line1 或 line2 的比重
ip route list 會看到 default 如下
default
nexthop via 100.100.100.254 dev eth0 weight 1
nexthop via 200.200.200.254 dev eth0 weight 1
ref. http://lartc.org/
http://dominia.org/djao/limitipconn.html
這個 mod 可以用來檔 flashget, net transport, netants 之類的多線程下載程式,
開太多線, 對 server 造成負擔, 又不會比較快
FreeBSD
cd /usr/ports/www/mod_limitipconn && make install
編輯 httpd.conf
LoadModule limitipconn_module libexec/apache/mod_limitipconn.so
AddModule mod_limitipconn.c
ExtendedStatus On
新增
<IfModule mod_limitipconn.c>
<Location />
MaxConnPerIP 2
</Location>
<Location /cgi-bin>
MaxConnPerIP 2
</Location>
</IfModule>
若有 VirtualHost, 請加到對應的 block
apachectl restart 後, 測試一下
log 裡面會發現 503, 就是被限制的線程
220.130.142.100 - - [20/Aug/2004:01:32:43 +0800] "GET /test.rar HTTP/1.1" 503 395
220.130.142.100 - - [20/Aug/2004:01:32:49 +0800] "GET /test.rar HTTP/1.1" 503 395
220.130.142.100 - - [20/Aug/2004:01:32:55 +0800] "GET /test.rar HTTP/1.1" 503 395
220.130.142.100 - - [20/Aug/2004:01:33:02 +0800] "GET /test.rar HTTP/1.1" 503 395
220.130.142.100 - - [20/Aug/2004:01:33:08 +0800] "GET /test.rar HTTP/1.1" 503 395
220.130.142.100 - - [20/Aug/2004:01:33:14 +0800] "GET /test.rar HTTP/1.1" 503 395
http://idesk.sourceforge.net/
可以把 icon 放到 root desktop 上(eg. IceWM's desktop)
原始網站上的 0.3.5 版的檔案壞了(已發信通知作者)
正確檔案可到這裡下載
要 make idesk, 需要下面的 rpm
freetype2-devel
libtiff3-devel
libungif4-devel
libimlib1-devel
作如下 link
ln -fs /usr/include/freetype2/freetype /usr/include
make 的時候, /usr/include/pngconf.h
__png.h__ already includes setjmp.h;
__dont__ include it again.;
這兩行會出現錯誤, 不曉得為什麼, mark 掉即可 make, make 出的來檔案也正常
idesk 需要 /etc/fonts/fonts.conf
這個檔是給 Xlib 看的
The X-specific library 'Xft' uses fontconfig along with freetype to specify and rasterize fonts.
若沒這個檔, 會出現如下錯誤
FontConfig error: Cannot load default config file
idesk 需要 /usr/X11R6/lib/modules/extensions/libextmod.a
若沒這個檔, idesk 可以跑, 但是有 mouse 動作時會出現如下錯誤, 而且 icon 透明的部分會變成黑色
Xlib: extension "SHAPE" missing on display ":0.0".
設定檔 $HOME/.ideskrc
範例
table Config
FontName: tahoma
FontSize: 8
FontColor: #ffffff
PaddingX: 35
PaddingY: 25
Locked: false
HighContrast: false
Transparency: 150
Shadow: true
ShadowColor: #000000
ShadowX: 1
ShadowY: 2
Bold: false
end
PaddingX, PaddingY: 這個參數在 README 並沒有提到, 在新版(0.5x)也被刪除, 意義不明
Locked: 是否鎖定 icon 位置
HighContrast:是否在 text 外框用反色描繪
Transparency: 透明度, 0=不透明, 255=完全透明, 指 mouse not hover 時的狀況
Shadow: 是否描繪影子
UseDoubleClick: 是否使用 double click 啟動程式
Bold: 是否 text 粗體
設定目錄 $HOME/.idesktop (內存 icon link file)
範例:
table Icon
Caption: mozilla
Command: /usr/bin/mozilla
Icon: /usr/share/icons/mozilla.png
X: 60
Y: 200
end
WinRAR 可以在註解加入 icon 建立參數來製作簡易的安裝程式
Delete 解壓縮前先刪除檔案
License 顯示程式的使用授權協定
Overwrite 選擇檔案的覆寫模式
Path 設定預設目標路徑
Presetup 指定解壓縮前執行的程式
SavePath 儲存目的地路徑(儲存路徑在 registry, 當下次再執行自解檔時會自動帶入, Path 參數存在時才有效)
Setup 指定解壓縮後執行的程式
Shortcut 建立解壓縮檔案的捷徑
Silent 跳過開始時的對話方塊
TempMode 解壓縮檔案到暫存資料夾
Text 加入純文字到自解檔對話方塊純文字視窗
Title 設定自解檔對話方塊標題
範例
Title=MSN Messenger 7.0.0225簡單的自解範例, 解完執行 msnnoad.exe
Path=%temp%
Setup=msnnoad.exe /i
Overwrite=1
Silent=1
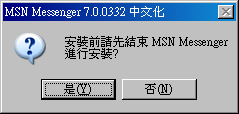
Title=MSN Messenger 7.0.0332 中文化解壓前秀一對話視窗, @後面接標題
Overwrite=1
Path=MSN Messenger
Silent=1
TempMode=安裝前請先結束 MSN Messenger\n進行安裝?@MSN Messenger 7.0.0332 中文化
Setup=msnmsgr

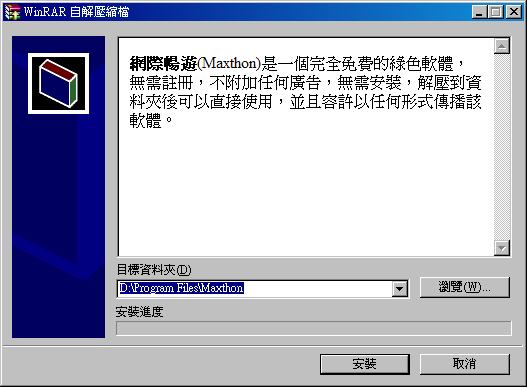
Title=Maxthon 繁體中文版Shortcut=D 建立桌面 icon
Text
{-
網際暢遊(Maxthon)是一個完全免費的綠色軟體,無需註冊,
不附加任何廣告,無需安裝,解壓到資料夾後可以直接使用,
並且容許以任何形式傳播該軟體。
}
Path=Maxthon
SavePath
Overwrite=1
Shortcut=D, Maxthon.exe,,, "Maxthon"
Shortcut=P, Maxthon.exe, Maxthon,, "Maxthon"
Shortcut=P, MaxthonUINST.exe, Maxthon,, "Uninstall"
Setup=Maxthon.exe
Shortcut=P 建立程式集 icon

Setup 程式有加參數時需留一空白
Step 0: SP2 整合
將 Windwos XP CD 解開到 x:\xpcd, 然後 xpsp2.exe/integrate:x:\xpcd
(xpsp2.exe 是完裝的 SP2 升級檔)
Step 1: 準備 winnt.sif (在 i386 目錄內), 設定好參數. winnt.sif 參數說明
範例:
[Data]
AutoPartition=0
MsDosInitiated="0"
UnattendedInstall="Yes"[Unattended]
UnattendMode=FullUnattended
OemSkipEula=Yes
OemPreinstall=No
TargetPath=\WINDOWS
Repartition=No
UnattendSwitch="Yes"
WaitForReboot="No"
DriverSigningPolicy=Ignore
CrashDumpSetting=0
NtUpgrade=No
[GuiUnattended]
AdminPassword=*
EncryptedAdminPassword=NO
OEMSkipRegional=1
TimeZone=220
OemSkipWelcome=1[SystemFileProtection]
SFCQuota=0[UserData]
ProductID=XXXXX-XXXXX-XXXXX-XXXXX-XXXXX
FullName="Windows XP"
OrgName="Microsoft"
ComputerName=*[RegionalSettings]
LanguageGroup=7,9,10[Identification]
JoinWorkgroup=WORKGROUP[Networking]
InstallDefaultComponents=Yes[Branding]
BrandIEUsingUnattended=Yes[Display]
BitsPerPel=32
Xresolution=800
YResolution=600
Vrefresh=75[Components]
msmsgs=off[URL]
Home_Page=www.google.com.tw
Step 2: 建立 $OEM$ 相關目錄
md $OEM$
cd $OEM$
md $1 $$ $Docs $Progs install
如下(用不到的目錄可以省略)

$1 下的所有檔案及目錄, 會複製到 %SystemDrive%
$$ 下的所有檔案及目錄, 會複製到 %SystemRoot%
install 是用來放 OEM 軟體的地方
Step 3: 在 $OEM$ 目錄下建立 cmdlines.txt, 寫入預定執行的指令
範例:
[COMMANDS]
install.bat
Step 4: 編輯 cmdlines.txt 內的批次檔, 軟體安裝需採用 quiet 或 silient 安裝模式, 才能自動安裝, 並不是所有軟體都支援這種參數, 參考應用程序的全自動安裝
範例:
@ECHO OFF
ECHO.
ECHO 系統優化
regedit /s tweak.reg
ECHO.
ECHO 安裝 MSN Messenger 6.2
start/wait install\msn.msi /qn
install\msn6xnoad.exe /s
Step 5: 使用 WinISO 將異動的檔案, 塞到 Windows XP 的 ISO 檔
Step 6: 完成, 可以使用 Virtual PC 或 VMWare 測試一下, 最後可燒成 CD
ref.
Windows XP Unattended Installation, Part II
MSFN's Unattended Windows
無人值守Windows XP安裝光盤
cramfs default maximum file size is 16M (16777215)
if file size > 16M, you'll get this message when mkcramfs
warning: file sizes truncated to 16MB (minus 1 byte).
it's possible to make limit larger!
modify to value CRAMFS_SIZE_WIDTH in kernel source
include/linux/cramfs_fs.h
(default #define CRAMFS_SIZE_WIDTH 24)
after I tested, maximum value is 28, in other word,
file size limit 268435455 (256MB)
don't forget to modify mkcramfs, get cramfs tools and
change the value as above (modify /usr/include/linux/cramfs_fs.h and rebuid mkcramfs), use modified mkcramfs to make cram files.
note. CRAMFS_SIZE_WIDTH in kernel and mkcramfs must be the same,
or cramfs will not work.
Check Email format ^[a-z]+[0-9a-z._-]*@[0-9a-z.]+[a-z]$
will match pank@test.com, henry.pan@test.com, a_pank@test.com but not 1pank@test.com, pank#@test.com, %pank@test.comCheck unix userid ^[a-z][a-z_-]*
will match pank, pan_, pank- but not 1pank, pank#, pank!pank 是一般 user, home 在 /home/pank
先以 root 權限做下列動作
cd /home/pank
touch file1 file2
chmod 644 file1
chmod 0 file2
mkdir dir1 dir2 dir3 dir4
chmod 755 dir1
chmod 0 dir2
chmod 777 dir3
chmod 1777 dir4
cp file1 file2 dir3
cp file1 file2 dir4
然後再以 pank 權限執行下列指令, 請說明會有什麼反應及動作
1. cat file1
2. cat file2
3. ls dir1
4. ls dir2
5. rm file1
6. rm file2
7. rd dir1
8. rd dir2
9. rm dir3/file1
10. rm dir3/file2
11. rm dir4/file1
12. rm dir4/file2
解答如下
# 範例: 周大拍的2004台北電腦應用展
URL="http://www.pbase.com/albertjou/show16&page=all"
for i in `lynx -dump $URL | awk -F'[] ]' '/http.*image/ {print $NF}'`
do
    wget `lynx -source $i | awk -F\" '/IMG.*upload.*jpg/ {print $6}'`
done